
I’m setting out to copy an existing RTW item from my wardrobe. When I used to do this kind of thing as a teenager, I always thought was a bit of a knock-off because I hadn’t bought a pattern, it didn’t involve lots of Complicated Technique and it wasn’t done ‘properly’. However, since falling in love with @withwendy on Youtube, I realise copying an existing garment is perfectly legit. I’ve made a t-shirt in the image of one of my favourites and I’m really chuffed to bits with how it turned out.
T-shirts are such an easy option garment that they probably don’t get the credit they deserve. It’s probably easy to take them for granted. However I know that I can’t just throw on any T-shirt and have it look good. The worst are those kind of all purpose things you (or someone who should know better) would buy at a tourist attraction. They are usually shapeless (even the so called women’s fit) either too baggy or too tight in the important places and they just don’t do me any favours. So when I have one that fits and I feel and look good I wanna hang on to it.
I also wanted to replicate it so I used a very simple paper trace method to draw around my favourite t-shirt to create a pattern for my new t-shirt.
It couldn’t be simpler, what you’ll need:
- A T-shirt with a fit that you love
- Fabric – I used 1 m (that’s what I had) print jersey fabric, stretch fabric is essential.
- Tracing paper or any plain paper, I actually used A3 printer paper.
- A flexible curve or french curve.
Then you are ready to go.
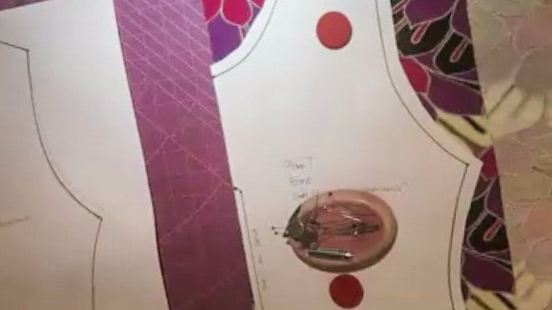
Drafting the front and back pattern
- Fold your T-shirt in half and place on tracing paper. Trace the outline of the shirt leaving out the sleeve and the neck.
- Using the curve draw in the shape of the neck and where the sleeve will go.
- The neckline will be for the back, you need to cut another pattern piece with a lower neckline for your front.
Drafting the sleeves
- Place the t-shirt on the tracing paper and draw around the outside of the sleeve
- Using the curve draw the inner line of the sleeve where it joins the body.
Make sure to mark on your new pattern where to place the pattern on the fold and you can also make a note of where you need seam allowance
Cutting the fabric
Place your pattern pieces on the fabric as normal and cut out your T-shirt pieces remembering to cut on the fold where necessary.
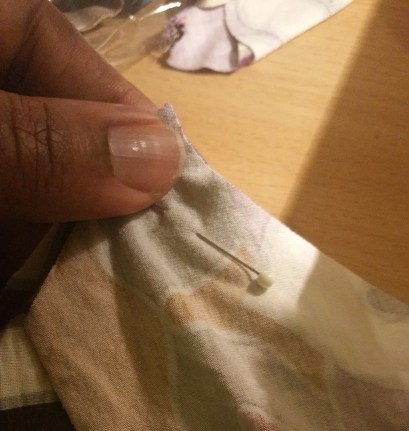
Making it up
- Finish all edges, I used my overlocker but you could zigzag
- With the right sides together, join the front and back shoulders using a fine zigzag stitch to accommodate the stretch
- Pin the sleeves in place and stitch them to the body, again using zigzag stitch.
- Pin the side and sleeve seams together and stitch or overlock them in one process .
- Fold over and press a small hem then zigzag the hem.
I’m really happy with my T-shirt, it fits really well and the fabric feels lovely. A totally non-destructive process I still have my favourite t-shirt to wear. I think my only gripe is that I didn’t quite get the pattern symmetrical. I thought about it a lot when cutting but I just didn’t have enough fabric to try to match the pattern. Next time… learning curve and all that!
Ta da!
Inspiration form @withwendy, I will definitely be trying this method again.
Have you cloned a favourite item, was it worth it?

3 thoughts on “The humble T-shirt was remade in its own image…”