
You know when you do something daft and then you are secretly pleased when he does something equally daft? Is that just me? Well, a couple of years ago, I lost my denim jacket somewhere when we were travelling around Albania, but we’ll talk about that later.
Well, later that same year he left his jacket in the wardrobe of a motel somewhere in California! So now we each need a new jacket!
I am going to replace both of these jackets with the magic of sewing. Here in part one, I’m working on his jacket.

After a good deal of faffing, I found a pattern in my stash for his and hers jackets, and he chose the fabric. I was a little dubious about the cloth as it was a very heavy mystery material which we found in a shop in Bulgaria (?) and when I cut out the jacket it seemed enormous. I had obviously made some kind of error with the sizing. I later discovered that the pattern actually comes in two size ranges and I had got the larger range by mistake. So I chose a different pattern and fabric which was closer to that of the original.

The replacement pattern looks much more like the original jacket. I also chose fabric which was a closer match too. I used a khaki coloured cotton twill which I think is much more suitable for a mid-weight jacket. We’re looking at view B here.
Preparing the paper pattern I now use my craft knife to cut out the pieces, it is much quicker and more efficient than scissors and is also less achy on my hands and knuckles.
The first stage, if you stick to the instructions is to make the front pockets. These are slanted with a welt so a little construction is required.

- Place the pocket on to the facing right sides together matching the markings
- stitch round the guide lines forming a rectangle.
- slash along the centre line and the corner markings to create an opening
- Turn the pocket bag from the front of the work to the back
- Press open to form nice neat rectangle like a letterbox then fold up the bottom section in line with the top of your opening and press again, this forms the welt
- from the front stitch around the welt to secure it in place, stitch in the ditch so your stitches less visible.
- fold down the upper pocket section and pin the sides of the pocket back together but not to the facing. Stitch the pocket sides together.

This pattern is unlined and my ‘client’ wanted a lined jacket as his lost one had a red check flannel lining. So I ventured onto Etsy and found a really nice flannel material that would go with the jacket very nicely.

The pattern has no lining but it does have a facing – I used the back and sleeves as is, then I created the front lining by laying the facing piece on top of the front piece then tracing over the pieces using the ‘negative’ space to become the lining piece.


I added a centimetre back into the edge to form a seam allowance and copied all markings from the original pattern from the front including notches and the lengthen/shorten markings.
When my lining fabric arrived, I cut the back as per the outer pattern and the new front lining piece and fitted them together. When it came time to cut out the sleeves, however, I realised that my fabric was not wide enough. I ended up piecing the top of the sleeve in the lining fabric and using some light sweatshirt fleece for the lower section which would not be seen.

Since I have convinced my client that I am in fact, a magician, he now, of course, decided he wants an internal pocket so it was back to the drawing board to design inside a welt pocket for this jacket. The first estimate of the pocket was far too small so I caved in and went to look at one of his old jackets to get a better idea of the size of pocket that I needed.
Using the front pocket construction as a guide, I used a rectangle 40 cm by 18 cm I folded this in half with right sides together and then added a pleat where the welts would go.

I copied all markings onto the pocket and also onto the jacket as a stitching guide.
The next stage was to join the facing to the jacket front sandwiching the zip between the two pieces
The zip presented a big challenge for me. I had found a nice metal separating zip that I liked. The only problem was it was too long. I have had this issue before, trying to shorten a metal zip is not easy. I’d managed to get a zip shortened professionally while I was in New York.

At this point, I show my love by basting this zip in place by hand (I hate basting) before stitching with a zipper foot.
I scoured the Internet and found a kit for shortening zips. I tried to emulate the guy in the NYC Garment District. No joy. I couldn’t get the little clips onto the zip and in the end, my client had to give me a hand with the elbow grease.

Then I joined the sleeves and sleeve linings at the cuffs; to do this turn both the sleeves and linings into the space between the lining and the jacket. Open the sleeves so you have the right side on the inside of the sleeves. Matching the underarm seams, with the right sides together, join the lining and the sleeve, pinning around it and then you can stitch round to join them. Then turn this back to the outside with your lining in the correct place inside your sleeve

Now comes an important stage. Maybe the most important one. Every garment has a make-or-break moment when the finishing is crucial to the success – quite often it’s the collar. I had to affix the collar to the garment making sure it is nice and neat as that is where the eye will naturally fall – it has to be perfect.
Again, as I had added this lining I had to improvise a bit on the installation of the collar. I had two sections to combine so I had to construct front and back separately then join them together all the time taking care that all the joins matched perfectly. This has often been the point where I have ruined a garment in my eyes or given myself a tough task to tidy up a mess when I haven’t taken enough care.

So by the magic of sewing, my client has a new, mid-weight jacket to keep him covered in Spring/Autumn. This increases the number of garments I’ve made for him by 100%. I’m delighted that he is very happy with it. Sewing for others can be very rewarding.


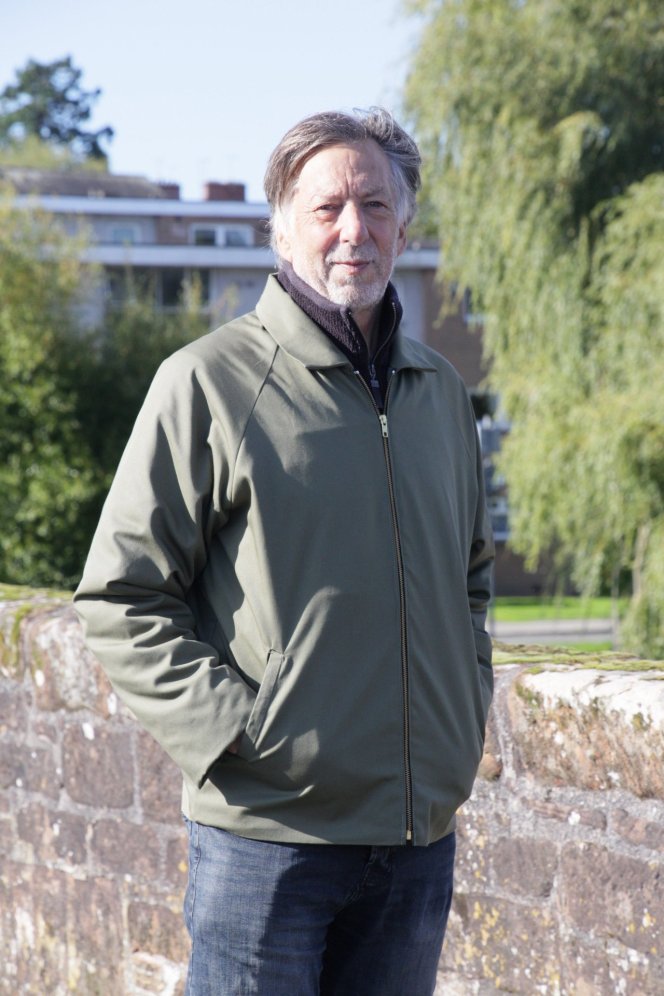
Here he is in his new jacket. What have you made for your loved ones? Did it all go smoothly and did they love the results? I’d love to hear about it.
Thanks for dropping by.


This looks wonderful!!
LikeLiked by 1 person
Thank you so much, it’s been put into service and my ”client” is very happy!
LikeLike