
My typically over-ambitious sewing plans are proving slower to yield fruit than I intended, but I do have a new Finished Object to share. This coat came into my head when I found this double-faced faux shearling fabric online. It is in a pale teal green colour which is one of my favourite colour families. It’s called Old Green in most fabric stores. If you don’t like synthetics look away now!

I’ve wanted to make some kind of fake sheepskin jacket for ages, I was thinking of an aviator style jacket like the Reiss jacket above and had a favourite pattern that I wanted to use for it, I had even made a version of this mythical coat before, but I never found quite the right fabric for what wanted to do. This material is nearly there. It’s faux suede on one side and a fur effect on the other. It’s quite light so it will be a spring/autumn weight jacket as it won’t be lined. As I had enough fabric I decided to make a coat rather than a jacket.
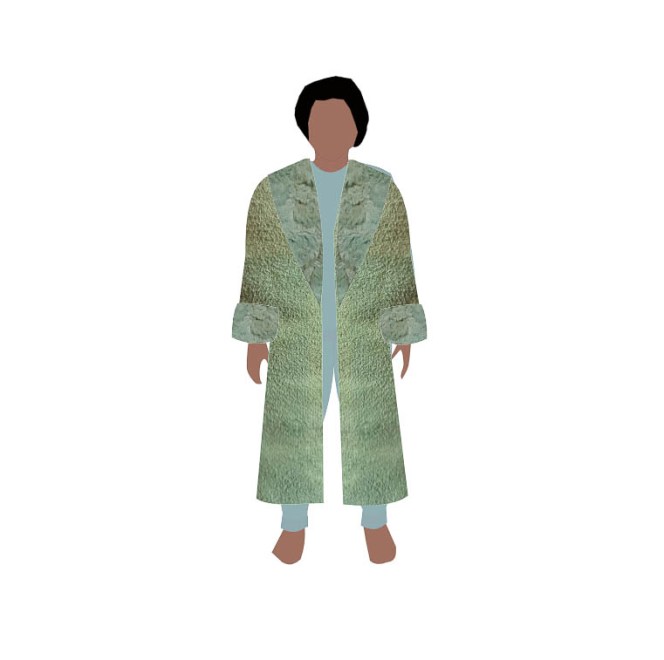
I have the idea of a lightweight coat with the fur on the inside but with a large lapel or collar exposing the fur. I had thought I was going to adapt the Kinder cardigan pattern, but then I remembered a Vogue DKNY pattern that I’ve had in my stash for several years waiting for the right fabric. It is an oversized jacket with a large hood/collar and I thought that would be perfect for a full-length coat.

DKNY Vogue 2547
I always wanted to make the blue/green quilted version, but never found the right material. It never occurred to me to do my own quilting but that’s such a thing now, I might have to add that to my ever-growing list of things I want to make. However, I digress, I am making a full-length faux shearling coat just as Spring is on the horizon. I think I will get some use out of it before it’s too warm and I have every intention of taking it to Portugal on my spring holiday.

When I opened the skinny pattern packet I could see it’s quite a simple project with not many pieces – the instructions are just two pages, this tells me straight away that this is a very easy make and because I’m using double-sided fabric, I won’t even have to do the lining, so far so good. I’m going to simply lengthen the body pieces as is it quite a straight pattern. I decided to make the coat in sections so it would look like hides that have been joined together.
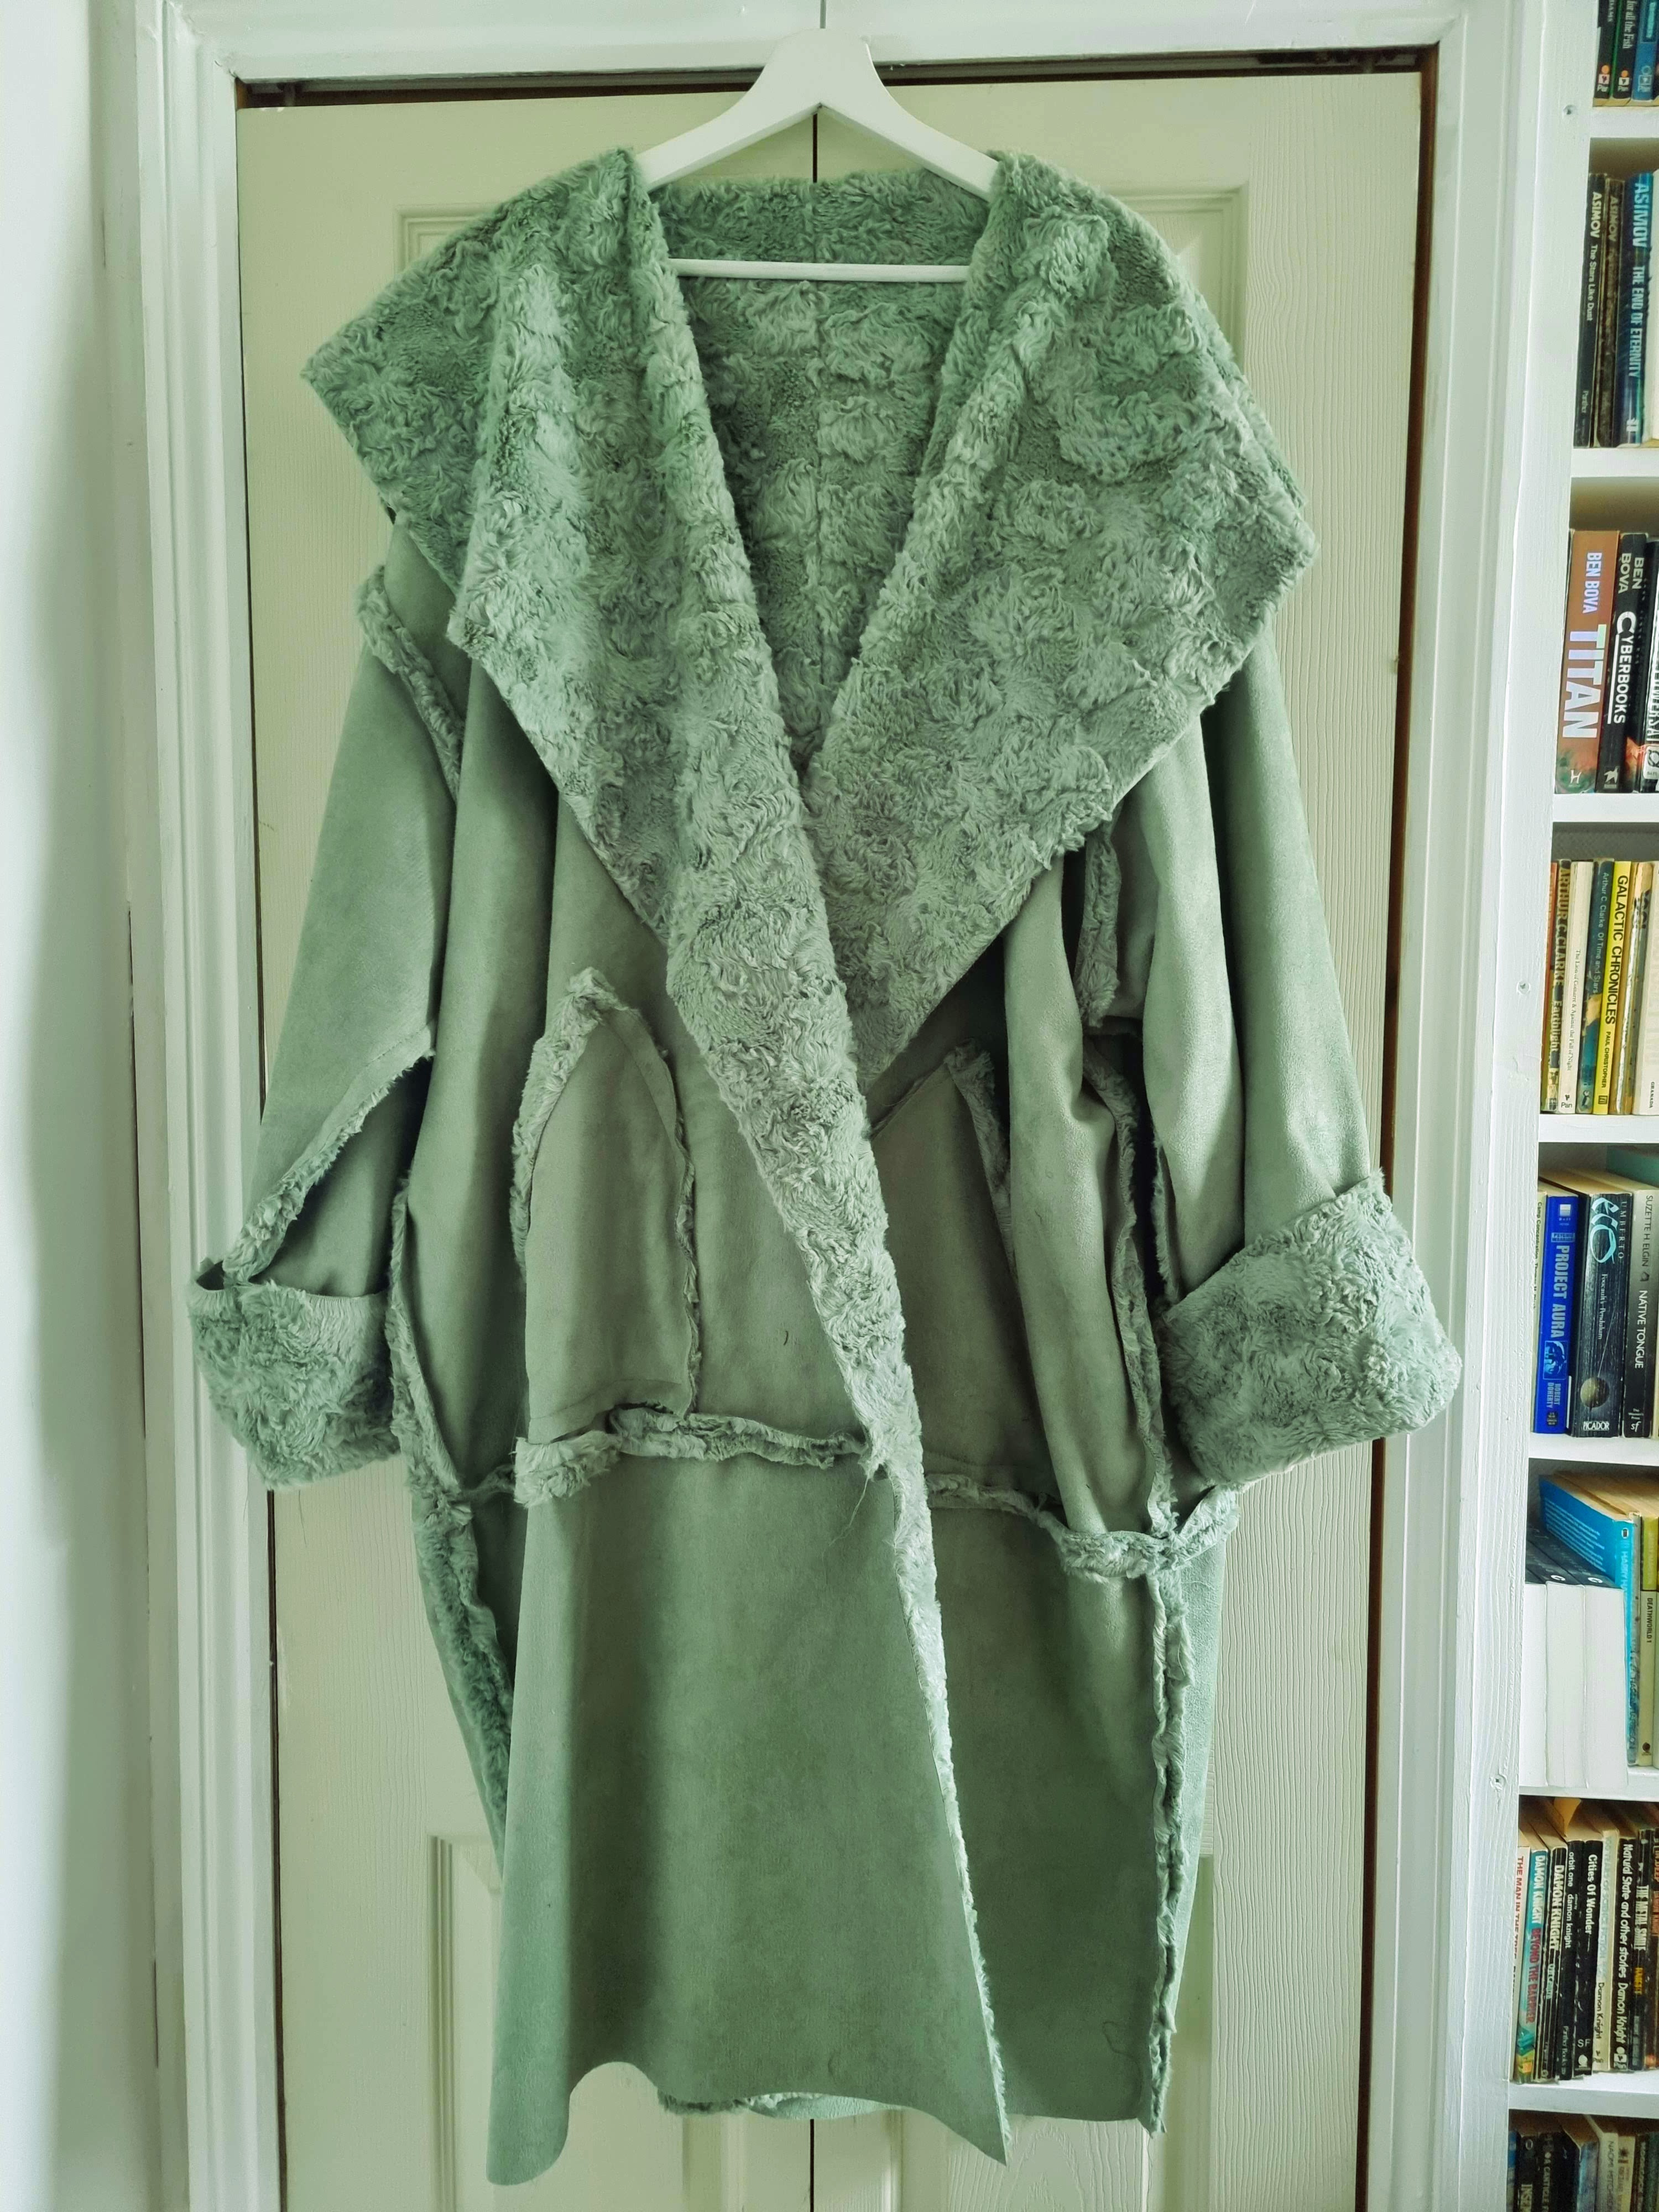
I laid out the fabric as a single layer and with the fabric heavily weighted to make sure there was no shifting, marked around the pattern piece with the Frixion removable pen. I cut it out and then flipped it and cut its mirror image. If you are using this type of fabric, I recommend cutting it on the suede side, using a rotary cutter or a sharp blade. I found scissors a little difficult with this material. This fabric is flufftastic and sheds everywhere so I used a hand vacuum to suck up the fluff as I cut it and I was still able to leave the edges raw when I was done.


This Vogue pattern must have been one of my relatively late purchases as it goes from size 14 to 18. I’m going to cut it a bit larger equivalent to 20 because I want it to be very oversized. So I followed the increments on the pattern piece and added the 1.5cm for an additional size on all the seams that have any increases.

The front and hood are all in one and it makes one enormous pattern piece and the back looks quite large as well. I cut it off at about thigh length then cut rectangles 40 cm deep matching the width of the front and back pieces. I assembled the top of the coat first, sewing the hood together which forms a sort of shawl collar which you have to do a little finagling to fit it to the back neck before the front and back are joined. Then I sewed the four bottom pieces together and matching all the seams, joined this to the top of the coat.

The thickness of the fabric meant I needed a little bit of help in sewing it and I was able to use my walking foot for the first time. I had a little bit of trouble figuring out how to attach it, but with the magic of YouTube, I was able to work it out. It definitely made a difference helping to feed the thick fabric underneath the presser foot without it shifting.

With the excess fluff vacuumed away, I could get away with leaving the edges unfinished to give it the effect of raw hides. It also meant there was less work finishing edges – no seams, no turning up and enclosing raw edges. In addition, as I wasn’t lining it, the coat came together relatively quickly. I enjoy making coats and bagging out a lining is one of my favourite techniques to fine-tune, but not having to do it was a boon in this case. I created patch pockets instead of welts as they could show the fur effect more readily and were easier.
First impressions are a YES! I’m really, really happy with it. To be honest I probably didn’t need to oversize it even more than the pattern as it’s very big but I am delighted with the finished object.


And here it is on me…


I’ve been wearing this around Portugal especially in the evenings as it is definitely not as warm as I’d hoped. It’s another eye-catcher – a great fun look and serves well as a travel blanket too.
How many coats is too many coats?
Thanks for dropping by,


That is a great coat. Love the color, love it on you. And no, there’s no such thing as too many coats, and I live in Florida.
LikeLiked by 1 person
Oh, thank you, Suzanne, that’s great to hear that even in Florida, you can’t have too many coats. I’d love a bit of your warm weather right now. (Not the stormy stuff, mind you) 🙂
LikeLiked by 1 person
Well we are wimps here. Drop below 70 (forget the Celsius), and brrrr! Actually, I am in north Florida. We don’t get snow, but we do have a short winter with freezing temps occasionally. And spring and fall have cold morning temperatures, with heat in the afternoon!
LikeLiked by 1 person
Oh, that’s interesting, I think we assume the whole of FL is tropical. It’s nice to have seasons.
LikeLike
You can’t have too many coats. After all with the weather in the
LikeLiked by 1 person
Gah I managed to post that before I finished typing! I was going to say with the UK weather our coats are all a lot of people ever see. That is an amazing fabric and you really did it justice.
LikeLiked by 1 person
Thank you!! You’re right, the coats get seen the most. I often get the posting trigger finger!
LikeLiked by 1 person
Love your coat! When it comes to coats, I don’t think you can have too many. :}
LikeLiked by 1 person
Thank you so much, I agree entirely, never too many coats!
LikeLike
That coat is wonderful and the color is spectacular!
LikeLiked by 1 person
Thank you, I do really like making coats and love this colour so much.
LikeLiked by 1 person